
 •
• Why should we pre-render Angular applications?
At the moment of writing this article, there are several ways of optimizing Angular applications - We could compile them ahead-of-time through AOT compilation. We could use service workers to optimize caching. And there are plenty of other PWA (progressive web app) features that can increase the quality and overall performance of our Angular applications.
However, there are a still a few problems that these optimizations won’t fix:
- SEO (search engine optimization): At the time of writing, SPAs (single-page applications) are harder to index by search engines because the content isn’t available on load time. Therefore, the application is likely to fail on several SEO requirements.
- Initial page load could be faster: Since the application still needs to be bootstrapped after the page is loaded, there is an initial waiting time until the user can use the application. This results in a bad user experience.
These two problems can be fixed by implementing SSR (server-side rendering). SSR executes the Angular application on the server. That way the server will actually serve the compiled content in a way that search engine crawlers can read it. This is really the best of both worlds: The application will be rendered on the server, but when the JavaScript bundle is loaded, it will turn into a SPA. That way the application is rich and fast at the same time!
To optimize our StrongBrew website, we started using this approach. It was pretty fast when we ran it locally. However, the StrongBrew website is hosted on Firebase and the SSR part was hosted by Firebase functions.
We really love Firebase and everything it stands for, but for us, SSR on Firebase functions was just too slow. Sometimes it took 4 seconds to serve the content… Since the loading time of a website is very important for keeping our visitors, we had to find another way to serve the content in a more effective manner.
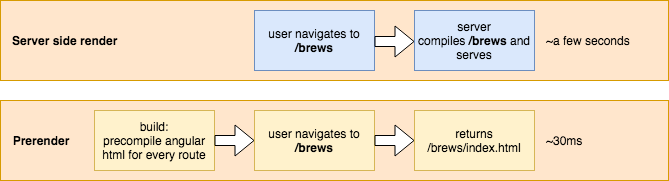
SSR works like this: A user navigates to a URL => the server compiles the application and serves it. But instead of compiling every route when the server receives a request, what if we could execute the SSR logic for every route at build time? That would certainly fix our problem.
That way we would run generated static HTML files, which is insanely fast, and when the JavaScript bundles are loaded, the browser would take over.
This also uses the best of both worlds: Ultra fast loading time + we don’t need to give up our rich SPA experience.
The result went from several seconds to 30 milliseconds.
This is a super fast and super effective improvement but it has one very important limitation. It’s not possible to prerender dynamic content. The data in the StrongBrew website isn’t fetched by AJAX calls (at least not the data that has to be indexed). It rather works with simple webpack imports of JSON files. These are inserted at build time.
This does not mean that loading content dynamically isn’t possible at all, it just won’t get prerendered.
Let’s dive in
Enough chit chat! Let’s dive into some code.
I’ve created this GitHub repository just for you! It’s a simple website with a few pages and the build system doesn’t know how to pre-render yet.
Checkout the branch runtime by running the command git checkout runtime. When running npm i && npm run start, the bash should install all the NPM dependencies and host the application on http://localhost:4200, just like any default Angular CLI application.
Installing the dependencies
Great! We have a running website, but nothing is pre-rendered yet.
The first thing we need to do is to install @angular/platform-server by running
npm i @angular/platform-server -D. This is the most important bundle for SSR. This module contains the basics to run the Angular application on the server.
Applying the server transition
Next, we need to update the app.module.ts to enable server transition. This will make sure that Angular takes over on the frontend when the JavaScript bundles are loaded.
// src/app/app.module.ts
@NgModule({
  ...
  imports: [
    BrowserModule.withServerTransition(
        // this is just the name of our application
        // configured in angular-cli.json
        { appId: 'prerender-angular-example' }
    ),
    ...
  ],
  ...
})
export class AppModule { }
Creating the prerender module
Then, we need to create a specific prerender module that will use the AppModule we have just adjusted. Let’s create an app.prerender.module.ts where we can tell which component it has to bootstrap.
// src/app/app.prerender.module.ts
import { NgModule } from '@angular/core';
import { ServerModule, ServerTransferStateModule } from '@angular/platform-server';

import { AppModule } from './app.module';
import { AppComponent } from './app.component';

@NgModule({
  imports: [
    AppModule,
    ServerModule,
    ServerTransferStateModule
  ],
  bootstrap: [AppComponent]
})
export class AppPrerenderModule {
}
Defining a prerender entrypoint
To use the SSR logic at build time, we need to have a specific bundle. Since the main.ts file is used to bootstrap the application for the browser, we also need a main.prerender.ts file that will be used to create the prerender bundle.
Let’s create that file, shall we?
// src/app/main.prerender.ts
import { enableProdMode } from '@angular/core';
export { AppPrerenderModule } from './app/app.prerender.module';

enableProdMode();
A prerender tsconfig.json
We are almost there, I promise, but we need a few more things. We need a specific tsconfig file that compiles the bundle to something that the node server can read. It’s important for the compiler to compile to a commonjs package. This is because node.js uses this by default. So we need to create a tsconfig.prerender.json file:
/* src/tsconfig.prerender.json */
{
  "extends": "./tsconfig.app.json",
  "compilerOptions": {
    "outDir": "../out-tsc/prerender",
    /* node only understands commonjs for now*/
    "module": "commonjs"
  },
  "exclude": [
    "test.ts",
    "**/*.spec.ts"
  ],
  /* Additional informations to bootstrap Angular */
  "angularCompilerOptions": {
    "entryModule": "app/app.prerender.module#AppPrerenderModule"
  }
}
Letting Angular CLI know and generating the bundle
In the apps entry of the angular-cli.json file, we need to add a new app where we refer to the main.prerender.ts file and the tsconfig.prerender.json file. The app section should look like this:
{
      "name": "prerender",
      "platform": "server",
      "root": "src",
      "outDir": "dist-prerender",
      "main": "main.prerender.ts",
      "tsconfig": "tsconfig.prerender.json",
      "environmentSource": "environments/environment.ts",
      "environments": {
        "dev": "environments/environment.ts",
        "prod": "environments/environment.prod.ts"
      }
    }
Update the package JSON so it builds both the normal package and the server package. Set the output-hashing to none so that the build generates a clean main.bundle.js without any hash.
"build": "ng build --prod && ng build --prod --app prerender --output-hashing=none",
When running npm run build the following files should be created:
- dist (this contains the normal build)
dist-prerender/main.bundle.js
This main.bundle.js file exports a module called AppPrerenderModuleNgFactory. This is the module that we can use to pre-render the whole thing.
Generating the static files
We have just generated the main.bundle.js, the file that we need to perform server-side rendering. However we don’t want to do server-side rendering in this case, we want to pre-render the html at build time. To do that we need a script that will complete the following steps.
- Create an array with routes (we could automate this if we want)
- Loop over that array and for every entry:
- create a folder in the dist map with that route name
- use the
main.bundle.jsto render the html and store that html as anindex.htmlin the folder we just created. - Overwrite the
dist/index.htmlfile.
Let’s call that script prerender.ts. Since I’m a typescript enthusiast, I want to develop the prerender script in typescript and use ts-node to run it.
We can start with creating an empty prerender.ts file in the root folder and installing ts-node with npm i -D ts-node
Now we can update the scripts section of the package.json so that the render function is called when the build is completed:
 "scripts": {
    "ng": "ng",
    "start": "ng serve",
    "build": "ng build --prod && ng build --prod --app prerender --output-hashing=none",
    "postbuild": "npm run render",
    "render": "ts-node prerender.ts",
    ...
  },
The only puzzle piece that is still missing is implementing the prerender.ts file.
Completing the prerender.ts file
The following code should be self-explanatory:
import 'zone.js/dist/zone-node';
import * as path from 'path';
import * as fs from 'fs';
import { enableProdMode } from '@angular/core';
import { renderModuleFactory } from '@angular/platform-server';
import { AppPrerenderModuleNgFactory } from './dist-prerender/main.bundle';

const distFolder = './dist';
const index = fs
    .readFileSync(path.resolve(__dirname, `${distFolder}/index.html`), 'utf8')
    .toString();

// we could automate this based on the app.routes.ts file but
// to keep it simple let's just create an array with the routes we want
// to prerender
const paths = [
    '/about',
    '/brews',
    '/consultancy'];
enableProdMode();

// for every route render the html and save it in the correct folder
paths.forEach(p => renderToHtml(p, distFolder + p));

// don't forget to overwrite the index.html as well
renderToHtml('/index.html', distFolder);

function renderToHtml(url: string, folderPath: string): void {
  // Render the module with the correct url just
  // as the server would do
  renderModuleFactory(AppPrerenderModuleNgFactory, {
    url,
    document: index
  }).then(html => {
    // create the route directory
    if (url !== '/index.html') {
    fs.mkdirSync(folderPath);
    }
    fs.writeFile(folderPath + '/index.html', html,  (err =>  {
      if (err) {
        throw err;
      }
      console.log(`success`);
    });
  });
}
Testing the pre-rendered application
To test the website, we can build the project with npm run build. To serve it, we can use http-server. We can install http-server by running npm i -g http-server. By navigating into the dist directory and running http-server, the application will be hosted on port 8080.
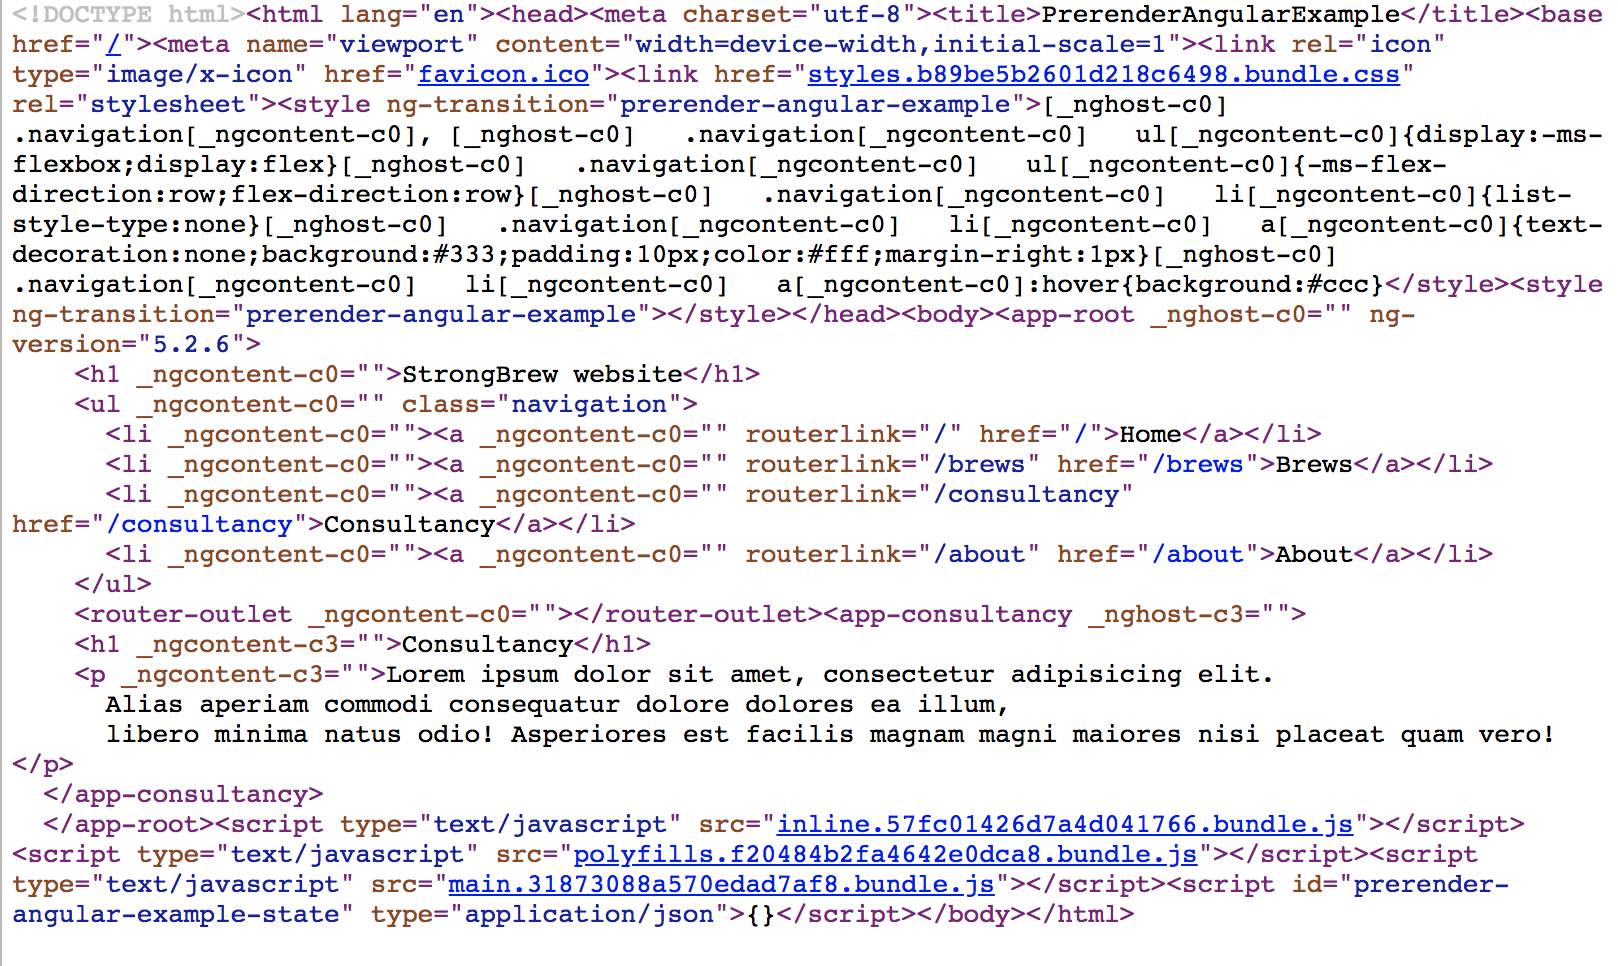
If we navigate to http://localhost:8080 in the browser, we will see the pre-rendered application. We can test the SPA experience by navigating between the different pages and we can test the pre-rendered part by looking at the source code.
Closing words
I hope you liked this article and learned something.
We can find the full pre-rendered version by checking out branch prerendered by running git checkout prerendered. To test this example, checkout the previous section.
Note: to optimize the HTML even more, we could use an HTML minifier like this one to shrink the HTML where possible. The example could look something like this:
const minify = require('html-minifier').minify;
function renderToHtml(url: string, folderPath: string): void {
    // Render the module with the correct url just
    // as the server would do
    renderModuleFactory(AppPrerenderModuleNgFactory, {
        url,
        document: index
    }).then(html => {
        ...
        // minify the html
        fs.writeFile(folderPath + '/index.html', minify(html),  (err =>  {
          ...
        });
    });
}
Special thanks
A very special thanks to the awesome people that have helped me with their reviews:
- Laurant Duveau @laurentduveau
- Dominic Elm @elmd_
- Sam Vloeberghs @samvloeberghs
- Ana Cidre @AnaCidre_
- Ruben Vermeulen @CrushTheButton
- Klaas Cuvelier @klaascuvelier